Source: MiniDisc Wiki contributors · September 3, 2026 snapshot · CC BY 4.0, except where otherwise credited.
Attribution and changes
Adapted from “Requirements”. Links, layout and file names normalized; missing database fields restored; remote embeds replaced with links. Manufacturer manuals and separately credited photographs retain their original attribution.
To use Web MiniDisc Pro you need:
- USB cable (most use USB Mini-B)
- Chromium web browser (Google Chrome, Microsoft Edge, Brave, etc.) or ElectronWMD
Windows
Windows requires a driver to be installed before using Web MiniDisc Pro (or any NetMD software.) The driver installation requires Administrator privileges.
Installing Zadig
Zadig is a Windows application that installs generic USB drivers. Web MiniDisc Pro needs generic libusb drivers to connect to the recorder.
These generic drivers cannot co-exist with Sony's official drivers. You must remove these before using Zadig, and remove the libusb drivers before installing Sony drivers for SonicStage.
Install Zadig from here, or use the Chocolatey package manager:
choco install -y zadig
Because it installs a device driver, you must run Zadig as an Administrator. Zadig is developed by Pete Batard, who also develops the Rufus USB formatting tool; it is safe to use and give administrator rights.
Connect the NetMD device to your PC. You should hear the Windows "hardware connected" sound, then launch the Zadig application. "Net MD Walkman" (or similar) should be automatically selected in the drop down box. If it isn't shown, select "Options" and then "List all devices"
The "Driver" field will show that the WinUSB driver will be installed.
Click "Install Driver". A dialog box will appear noting that driver installation may take up to 5 minutes.
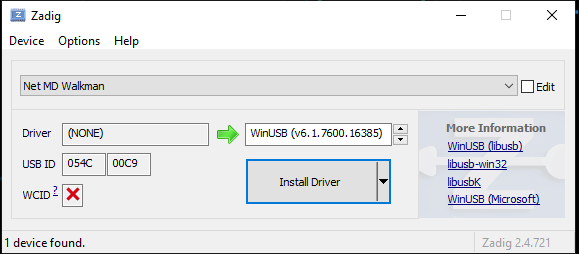
Once complete, you can close Zadig. You must repeat this process when using a different device (based on the USB device ID.)
Linux
Packaged browsers
Packaged versions of Chrome or Chromium (such as Snap or Flatpak) may not work with Web MiniDisc Pro at all. Using a natively-built version of Chromium from your distribution's repositories is preferred.
On Ubuntu 22.04 the following is known to allow Web MiniDisc Pro to work with the Snap packaged version of Chromium:
sudo snap connect chromium:raw-usb
udev rules / device permissions
Regular user accounts do not have the necessary permissions to use MD USB devices on Linux by default and will result in devices not showing up in the chooser or an access denied message. You can use the following steps on most Linux distros to make an exception for your MD device.
1. Go to the /etc/udev/rules.d/ directory.
cd /etc/udev/rules.d/
2. Download the latest version of the UDEV rules file from the Web Minidisc Pro repository:
sudo curl -O https://raw.githubusercontent.com/asivery/webminidisc/refs/heads/master/extra/70-netmd.rules
3. Run the following command to make udev aware of the rule change.
sudo udevadm control --reload
4. Run the following command to re-detect devices and apply our change.
sudo udevadm trigger
WSL2 on Windows
For those that need or prefer to live in Windows without installing Zadig, WSL2 is a solution that can work with some extra steps. It can certainly be automated/scripted better if used often.
Commands referred to are entered either in a Windows Adminstrator PowerShell window or Ubuntu/WSL2 terminal as directed.
1. Install WSL2 under Windows 10/11. Open a PowerShell prompt under Windows 11 by right-clicking on the Start button and choosing Windows Terminal (Admin). Accept the warning and you'll see the PowerShell window pop up with "Administrator" in the top left.
Next, install WSL by typing the following in the PowerShell window:
wsl --install
Just wait a few minutes and after it's complete, reboot when you're ready.
2. Set up your instance of Ubuntu/WSL2. After a reboot, you'll see terminal window that asks you to set a username and password. These are for the instance of Ubuntu running in the WSL, so they don't need to correlate to your Windows login. Update the packages
sudo apt update
3. Install USB support for WSL2 - this is required for USB devices to be seen within your Ubuntu instance.
In Windows: Download the .msi from here and install it. In Ubuntu/WSL2:
sudo apt install linux-tools-generic hwdata
sudo update-alternatives --install /usr/local/bin/usbip usbip /usr/lib/linux-tools/*-generic/usbip 20
4. Verify your device can be seen in Windows and link it to Ubuntu/WSL2. In Windows:
usbipd wsl list
Note the BUSID (in this case, it's 2-2)
PS C:\Users\YourUserID> usbipd wsl list
BUSID  VID:PID    DEVICE                                                        STATE
1-3    8087:0029  Intel(R) Wireless Bluetooth(R)                                Not attached
1-4    0c45:672c  Integrated Webcam                                             Not attached
2-1    046d:c332  USB Input Device                                              Not attached
2-2    054c:00c9  Net MD Walkman                                                Not attached
Attach it in Windows (replace the busid parameter with yours, in the example above it is 2-2):
usbipd wsl attach --busid <busid>
Now see if it's attached in Ubuntu/WSL.
user@PCname:~$ lsusb
Bus 002 Device 001: ID 1d6b:0003 Linux Foundation 3.0 root hub
Bus 001 Device 002: ID 054c:00c9 Sony Corp. Net MD
Bus 001 Device 001: ID 1d6b:0002 Linux Foundation 2.0 root hub
5. Since it's WSL2, we need to run udev so we can manage the device (important for the next step).
sudo /lib/systemd/systemd-udevd --daemon
6. Follow the Linux instructions listed above. Note your ID output from "lsusb" (in this case, 054c:00c9)
7. Install a chromium-based browser of your choice (I used Google Chrome) and then navigate to Web Minidisc Pro.
8. Push Connect and select your device!
Additional efficiencies and automations may be listed later.
After a reboot, reload you will have to repeat the "attach" (step 4) and udev (step 5) steps above and finally,
sudo udevadm trigger
Mac
MacOS usually needs no configuration for Chromium browsers to access NetMD devices. The Safari web browser is not currently supported. Use Chrome, Edge, or ElectronWMD instead.
Some Mac models (such as the M1 Mac Mini) have reported issues when devices are connected via the USB A ports. A USB-C to USB-A adapter may work better.
Hi-MD support
Hi-MD recorders can be set to either Hi-MD or standard MD mode through the menu on the device itself. In standard MD mode, the recorder will work like any other NetMD recorder and the steps above all apply.
For Hi-MD mode support added in 1.4.0, see the Hi-MD section later in the guide.