Source: MiniDisc Wiki contributors · September 3, 2026 snapshot · CC BY 4.0, except where otherwise credited.
Attribution and changes
Adapted from “General Recording (Dubbing) Guide”. Links, layout and file names normalized; missing database fields restored; remote embeds replaced with links. Manufacturer manuals and separately credited photographs retain their original attribution.
Unless you have a NetMD recorder or deck with built-in CD copying, MDs are recorded in real-time from another audio source. Whatever plays into the MD's input is recorded onto the disc. The output of the source (such as a CD or PC) which would otherwise play through speakers or headphones is instead copied onto the MiniDisc.
This guide will help you record audio to MD with the best experience and quality.
Signal path
Signal path is the journey from what is playing the audio to its destination. It travels from the source, such as CD or MP3, through an output jack, along a cable, and into an input on the MD recorder or speakers.
Think of it like a hose: the water starts at the tap, travel down the hose, and comes out at the tip to fill your swimming pool or water the plants. You cannot send water the other direction down the hose.
Adapters and converters often work in only one direction, with the source listed first. For example, a DAC (digital-to-analog converter) can take a digital signal as an input and will output analog audio. You cannot give a DAC an analog signal to be converted to digital - this needs a different converter called a ADC (analog-to-digital converter)
Inputs & outputs
The output of one device can be connected to the input of another. If you are recording a CD to MD, the CD player's output is connected to the MD's input. If you are copying the audio on a MD for backup or duplication, that MD is the source and your PC is the destination, so you use the output of the MD player and the input of the PC.
Connections
There are two types of audio signal: analog and digital. Analog is much more common, but digital can have higher quality.
Analog vs digital
Converting digital audio (such as CDs or computer files) to analog audio needs a chip which can vary in quality and accuracy. The MD recorder must then turn that analog audio back into digital for processing into ATRAC and copying to the disc (which is digital.) This chip in the MD recorder, called an analog-to-digital converter (ADC) also varies in quality and accuracy.
The result is two unnecessary conversions which can reduce audio quality. The amount of quality loss is minor, so do not worry if you do need to convert audio to analog - these differences are more academic than realistic, and you will have a great experience no matter what.
Digital inputs
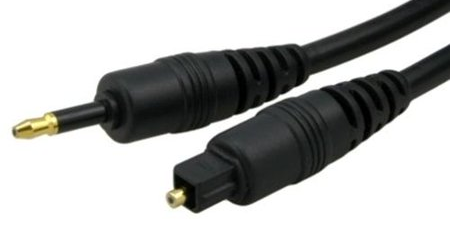 TOSLINK and Mini-TOSLINK plugs.
- S/PDIF coaxial (orange RCA jack)
- S/PDIF optical full size (TOSLINK)
- S/PDIF mini-TOSLINK (3.5mm hybrid headphone jack)
S/PDIF (Sony/Philips Digital Interface) is a digital audio format that carries uncompressed stereo audio using either coax (RCA) cable or optical fiber. Although SPDIF supports Dolby and DTS surround sound (5.1), no MD recorder can accept this format - only PCM.
Coax and TOSlink signals are easily converted with an affordable device. Many portable MiniDisc recorders use a mini-TOSLINK connector that can be converted to a full size TOSLINK connector using a simple adapter.
Analog inputs
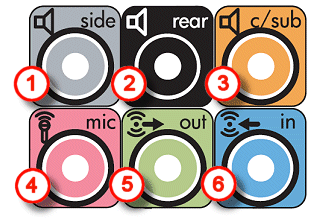 Standard PC rear audio jacks
- 3.5mm ("aux" or headphone jack)
- RCA (Red and White "phono" jacks)
- XLR balanced audio (professional microphone-style jacks)
Consumer MiniDisc recorders use either 3.5mm jacks or RCA connections for analog audio connections.
XLR is used only on professional equipment and is at a different signal level than consumer recorders.
Where possible, use line in and line outputs for your analog recording (5 on the PC in the image). Line in and outputs are designed to be connected to each other with less need for adjustments to volume or recording levels. If this isn't an option and you must use a headphone or microphone jack, take extra care to check the recording levels (volume.)
Sources
Audio recorded onto MiniDisc uses lossy compression (except Hi-MD in PCM mode) so you should use the highest quality source material possible to avoid introducing extra compression or artifacts.
Digital audio files
FLAC, ALAC, WAV, and AIFF files are all lossless - they are original and unadulterated waveforms of digital audio. Obtained from a CD or an online store like Bandcamp, you can be sure these are the best quality source available.
MP3, AAC, WMA, OGG Vorbis, and Opus are not lossless and should only be used if a lossless source is not available. The quality can still turn out great, but still seek the highest bitrate file available.
From a PC, VLC is the recommended audio player because it supports nearly all file types, playlists, and can insert 2 second pauses to the playlist to add track markers to the recording.
Streaming services
Most streaming services (Spotify, Apple Music, Google Play) use audio compression. Others, such as Tidal and Deezer, do have lossless tracks available.
Regardless of which streaming service you dub from, ensure you have the best possible streaming quality enabled in the settings. Also turn off any "auto-mix" or "continue playing" features once an album or playlist stops.
Compact disc
Dubbing from CD to MiniDisc was probably the most common source for MiniDisc content during its height. Using a digital audio cable, some CD players will copy track markers automatically and avoids all processing or additional compression. A CD and MD both have the same audio capacities, so you won't run out of space unless you try to dub a full 80 minute CD onto a 74 or 60 minute MD.
Burning an audio CD and then running a digital audio cable from a DVD player or PS2 are common dubbing methods nowadays.
Vinyl
Recording from vinyl has some caveats: the record will need to be flipped (and the recording paused or edited later); there could be time wasted by the run-on and run-off; and even a 80 minute MiniDisc is slightly too short to hold 2 full LPs (records) at 46 minutes each in SP mode.
Because vinyl recordings can sometimes have crackling and skips, take extra care to clean the record and stylus before making your recording - that skip or crackle will be on the MiniDisc forever.
Ensure the recorder is connected after the pre-amp, if applicable. Digital recording is not possible from vinyl; do not use a USB turntable to record from vinyl onto a PC, then onto a MiniDisc as this is more inconvenient and the MD's ADC chip is likely better than the USB turntable's.
The editing features of MiniDisc allow you to trim off any excessive run-on and run-off and to title the disc and tracks after recording.
Radio
Radio is not an ideal input source due to the lower fidelity compared to recorded media. However, MiniDisc will happily store up to 80 minutes (more with MDLP) from a radio or livestream. Recording from radio was once a very common method, but seems to have been replaced by the internet and podcasts for finding fresh media.
Preparing the dub
Recording to a MiniDisc happens in real time, so make sure that the equipment is free for the whole time period the source is playing.
See the equipment page and/or user manual for your MD device to see which inputs it supports.
Connect your equipment as directly as possible. For example, if you have a headphone DAC connected to your PC's TOSlink port, disconnect it and use that for your recording instead of the DAC's headphone or line out jacks. But if your recorder only accepts an analog input, the DAC's outputs are probably better than your PC's analog audio outputs.
If your amplifier / receiver has a tape loop (labelled "MD/CD-R" on later models) then this is also a great choice for analog recording.
Record mode
Some recorders (especially decks) have a switch between analog recording and digital. Make sure it matches your input source. There may also be a mono / stereo toggle.
Portables such as the N920 have a toggle to enable recording, which starts immediately.
Line out and record level
Many devices show a VU meter, or a red "peak" or "max" message when the incoming audio signal is too "hot" (clipping)
For headphone-out or microphone-in recording, adjust the volume on both the playback device as well as the MD recorder until it rarely or never shows the peak indicator.
If your device does not have a VU meter, take a brief test recording (or several) to make sure your levels are good. There is no harm in erasing or deleting tracks from a MiniDisc.
Preparing a PC
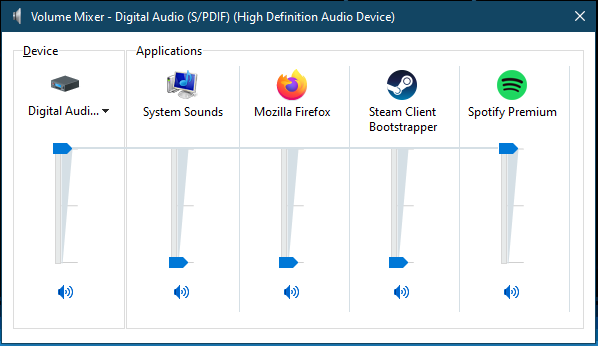
A PC will mix other sounds into the output, such as notification sounds and other applications. Mute the volume of all other applications before starting your dub.
Preparing the disc
Check the tab on the bottom left of the disc.
- Closed = ready to record
- Open = protected from recording
Synchro Rec
Synchro Rec is a feature that starts the recording automatically once the recorder notices an incoming audio signal. Check your recorder's user manual for full details.
Starting the dub
Once the dub has begun, leave the process alone! By interfering you only risk causing harm rather than helping. A MiniDisc is more vulnerable to vibration while writing. Any changes to the analog recording level will be jarring and unpleasant in the output.
If you have the ability to, listen to the recording as it happens - some sources have multiple outputs. If you do notice an issue, note the location so that you can re-record the track later and splice it in using MiniDisc's track marker and ToC features.